When looking for new bathroom tiles, kitchen tiles, floor tiles or other indoor tiles, you come across 1001 different types. A separate tile has been designed for every purpose, and they all have a different name you often haven't heard of. For this blog, we have highlighted one of these tile types. Read all about "Zellige" tiles, also known as Moroccan Zelliges.

What are Zellige tiles?
Where do Zelliges come from?
Zellige tiles are often handmade tiles from Morocco. Moroccan craftsmen have been making tiles in all sorts of colors, shapes, and sizes for hundreds of years.
The tiles are made of terracotta (clay) with a glaze layer over them. This makes the tiles shiny after they are fired. In the Netherlands, these tiles are also known as mosaic tiles.
What are Zelliges used for?
When you browse the internet these days in search of new tiles for your bathroom, kitchen, or floor, you constantly come across all sorts of small, square, trendy handmade tiles with natural shapes. These tiles are also known as Moroccan Zelliges. The Arabs used these small, often square tiles, mainly to cover walls and floors in bathhouses and palaces in the past.
Because the tiles are handmade, each tile is unique. Thanks to their beautiful handmade form and amazing color nuances, you can easily create a unique wall or floor that no one else has. These tiles provide a luxurious look and are of extremely good quality.

Photo 2: Moroccan Zelliges mosaic floor
How are Zelliges made?
Zelliges are made from Moroccan clay. This clay is pressed into a mold by hand to give it its shape. These can be squares, hexagons, triangles, fish scales, or other shapes. After forming, the tiles are sun-dried. Due to the climate in Morocco, they already gain considerable hardness this way. After drying, the tiles are provided with a glaze layer in a desired color. These can be all sorts of colors. After applying the glaze layer by hand, the tiles are fired in special "olive pit ovens". These are ovens made of clay that can be completely sealed. The ovens are fueled by pieces of wood, creating an extremely high temperature inside. After firing, the tiles are ready for use.
What different Zellige tiles are there?
Broadly speaking, there are three different variations of Zellige tiles: Zellige, Bejmat, and Platta.
-
Zellige tiles, square tiles ranging from 5x5cm to approximately 10x10cm. These thin tiles are only suitable for walls. Sometimes these square tiles are hand-chiseled into a different shape after firing.
-
Bejmat tiles, similar to Zellige tiles but thicker and larger. Bejmat tiles are made in the same way but are thicker, making them suitable as floor tiles. Bejmat is often a square or rectangular tile, approximately 14x14cm. These tiles are also sometimes chiseled into a different shape after firing, allowing for various variations.
-
Plattas, the largest variant of the three. These tiles are made in all sorts of shapes and colors and are suitable for both floors and walls. Often used for the bathroom, kitchen, toilet, or floor. However, these are usually thicker square or rectangular tiles, larger than Bejmat. This makes them excellently suited for floors.
Photo: Handmade Moroccan Zellige tile in star shape

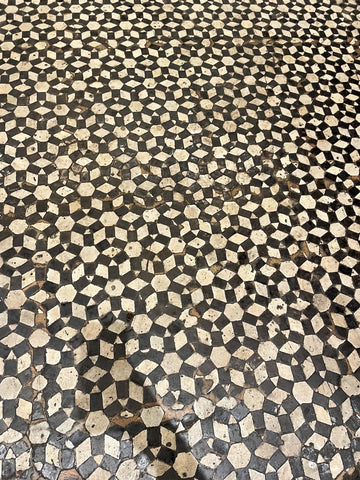
Photo 3: Ancient floor in a trendy restaurant in Madrid made of Zelliges in mosaic form

Photo: Mosaic floor of Moroccan Zelliges
How to install Zellige tiles?
Unlike standard machine-made wall or floor tiles, these Zellige tiles come with their own instructions when it comes to installation.
-
First, all tiles are unique in size and color because they are handmade. So, make sure to mix different packs of tiles before tiling. This will create the most beautiful nuances.
-
Before you start tiling, all tiles must be submerged in a tub of water. Leave them there for about a minute so they can soak up water. This is important to do, otherwise the tiles will break during or after installation.
-
Use tile adhesive suitable for the specific surface (get advice from an expert on this). The surface being worked on must always be bone dry. If necessary, treat the surface with a primer first. Zelliges can be "glued" to the wall. This means that the tiles do not need to be provided with adhesive, only the surface. After applying the tile adhesive, spread it with a notched trowel. Use enough adhesive with these handmade tiles. Due to the irregular shape of the tiles, they are not flat on the adhesive side and require more adhesive than normal tiles.
-
You can cut the tiles to size with a tile cutter. If you dare, you can also do this traditionally by hand using a sharp hammer. Gently tap the tiles to size. Choose a nice pattern, such as a herringbone pattern, to lay the tiles. Order approximately 10% extra for cutting loss during this process. Measure the space beforehand to determine the best and most cost-effective approach. It often works well to start from the center and work outwards to minimize cutting loss.
-
Due to the handmade shape of the tiles, it is best to lay them by eye. Using tile spacers often doesn't make sense because each tile is slightly different.
-
Flip's tip is to press several tiles simultaneously with a plank to get the surface as flat as possible.
-
After installing all tiles, the adhesive often needs 24 to 48 hours to dry. This is always stated on the adhesive packaging. In principle, you don't need to grout Zellige tiles. After all, they naturally have a beautiful irregular shape because they are handmade. You want to preserve this as much as possible. Are you installing these tiles in your kitchen or bathroom? Then DO grout them. You want to create a waterproof environment here.
-
Often, after an hour or half an hour, you can remove the remnants of the grout with a dry or wet cloth (again, read the packaging for this). Voila, this is the end result.

Photo: Zellige tiles laid on a kitchen wall